
Windows, being one of the most widely used operating systems, is a prime target for malicious actors seeking to exploit vulnerabilities or gain unauthorized access to sensitive information. Strengthening your security measures therefore becomes essential in safeguarding your digital assets. This guide walks you through a list of essential Windows security features you should consider for a safer PC experience.
Good to know: is the Windows Security app not opening for you? Learn how to troubleshoot.
1. Enable Antivirus Protection
Windows Security, formerly known as Windows Defender, is the default antivirus software for Windows and can provide sufficient protection against malware and security threats in most cases.
Antivirus protection is enabled in the app by default. Check for that by opening the Windows Security app and navigating to Virus & threat protection -> Virus & threat protection settings and clicking Manage settings. The toggle under Real-time protection on the next screen should be set to On.
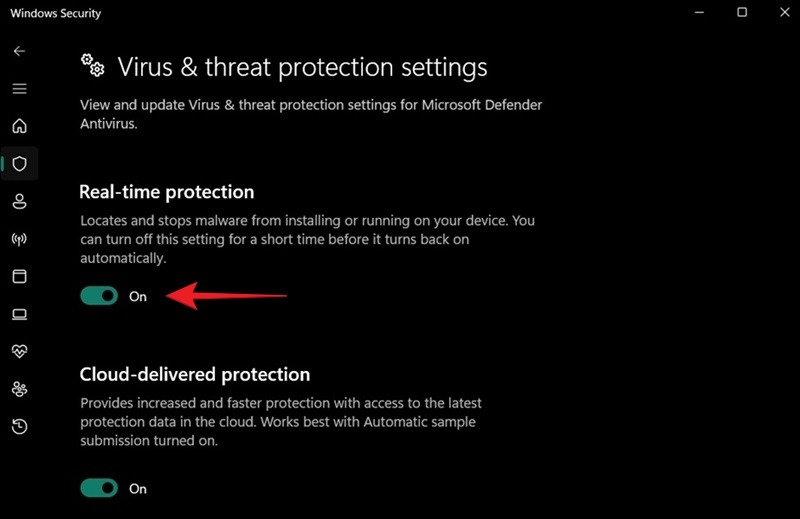
There are some cases where you may need to disable protection temporarily via the toggle, such as when installing certain software. However, keep in mind that real-time protection will soon turn back on automatically to keep your device safe.
2. Set Up Daily Scans
If you suspect a virus infiltration within your system, easily run a Quick Scan from Virus & threat protection. If the problem runs deeper, you can run a Full Scan via Scan options.
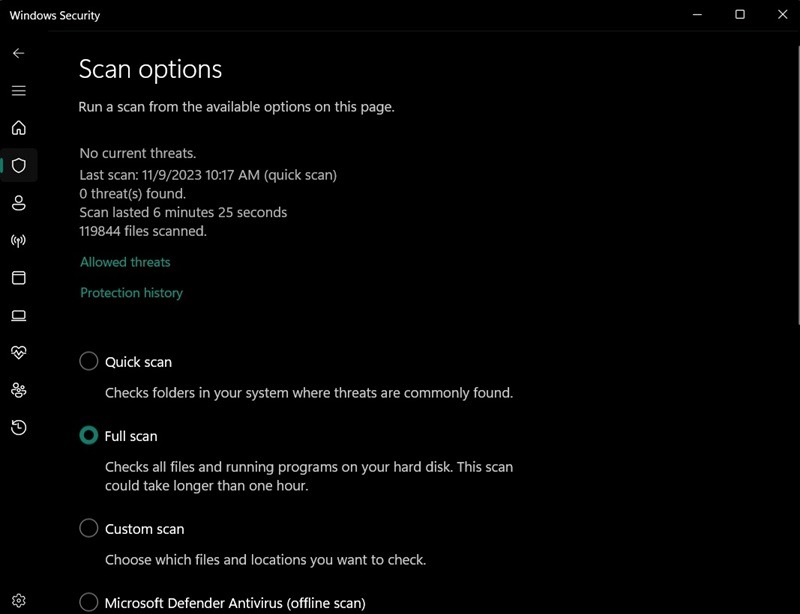
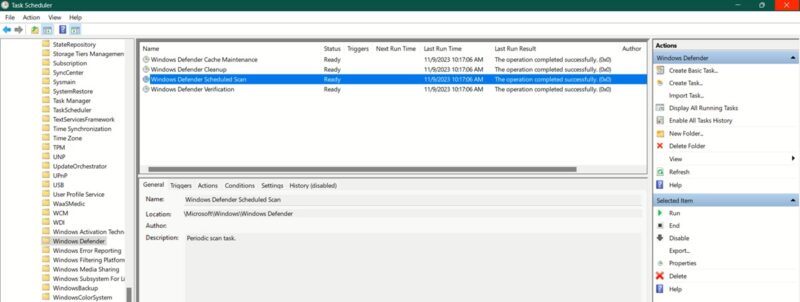
To make things even more secure, configure Windows Security to run a daily scan by accessing the built-in Task Scheduled utility.
Open the app, and navigate to Task Scheduler Library -> Microsoft -> Windows -> Windows Defender in the menu on the left. Double-click on Windows Defender Scheduled Scan on the right side.
Switch to the Triggers tab, and click the New button in the new window
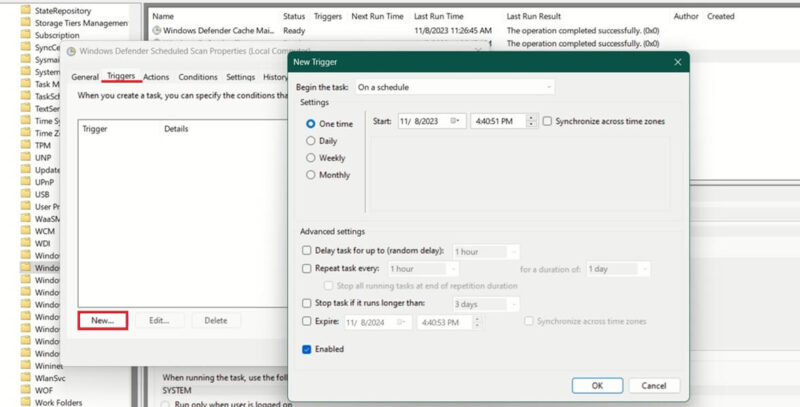
Add when you want the scan to occur and during which period.
FYI: improve your Windows automation skills by scheduling these useful tasks with Task Scheduler.
3. Enable Windows Firewall
Like real-threat protection, the built-in Microsoft Defender Firewall is enabled by default, so you don’t have to do anything to activate it. To verify that it’s enabled, open Windows Security -> Firewall & network protection. Make sure Domain network, Private network and Public network are all on.
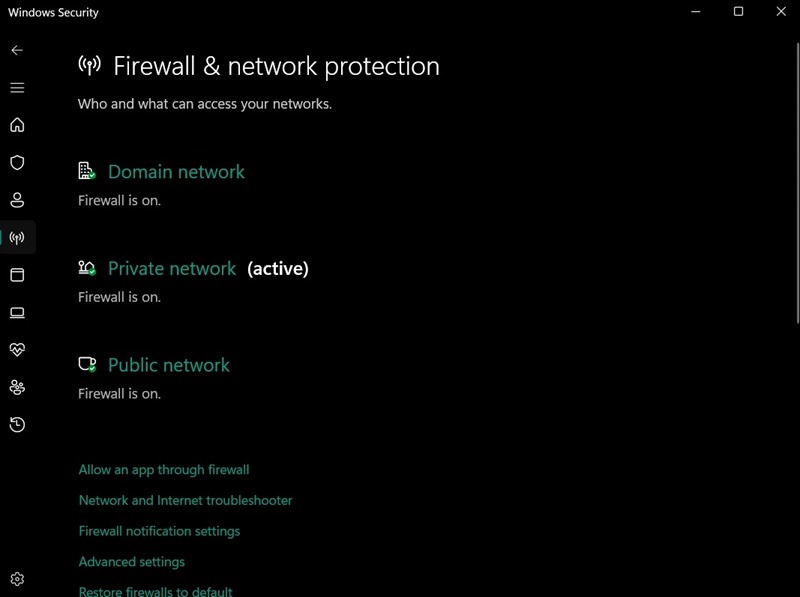
In certain cases, however, you may need to temporarily disable the firewall, such as when you’re installing a program that needs unrestricted network access. Click on Domain network, Private network and Public network, and switch the toggle under Microsoft Defender Firewall to Off.
It’s also possible to allow certain programs through the firewall. Learn how to do that in our guide.
4. Turn on Ransomware Protection
Ransomware protection is a feature that safeguards against a type of malware that prevents users from accessing your files unless they pay the hacker that infected the computer. It monitors changes that the app makes to your files.
To get it working on your device, go to Windows Security -> Virus & threat protection, and scroll down until you find the Ransomware protection section. Click on Manage ransomware protection underneath, and enable the Controlled folder access toggle. If you need to disable the feature, turn it off from the same toggle.
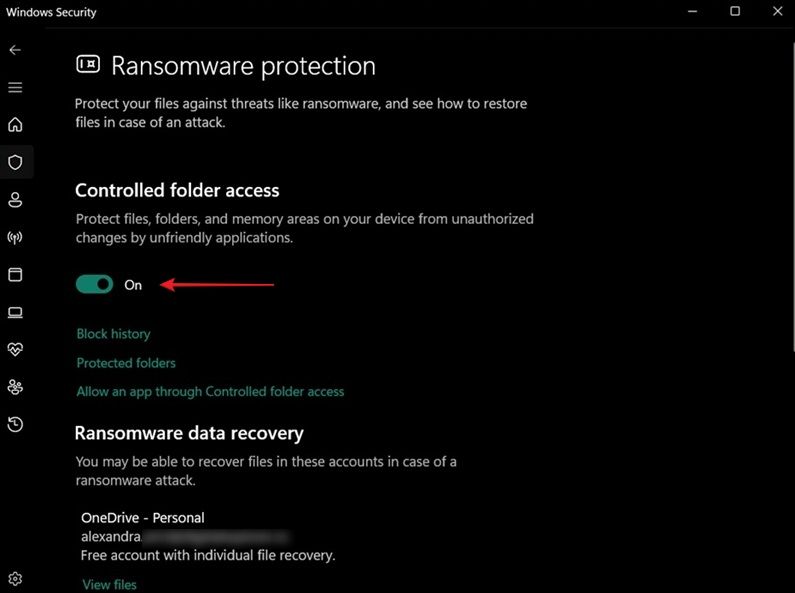
If you have a OneDrive account, you may be able to recover your files if you become the victim of a ransomware attack.
5. Set a PIN
Setting a PIN on your Windows computer represents a convenient and secure way to access your device. This usually consists of a combination of four digits, though you can extend it for added complexity.
You’re usually asked to set a PIN when you’re installing Windows or creating a new account, though you can opt to do it later. It’s backed up by the computer’s Trusted Platform Module (TPM.)
If you haven’t set a PIN yet on your device, you can do so via Windows Security -> Account Protection. Find the Windows Hello section, and click Manage sign-in options. You’ll be redirected to the Settings app, where you should choose the PIN (Windows Hello) option. Press Set up from there.
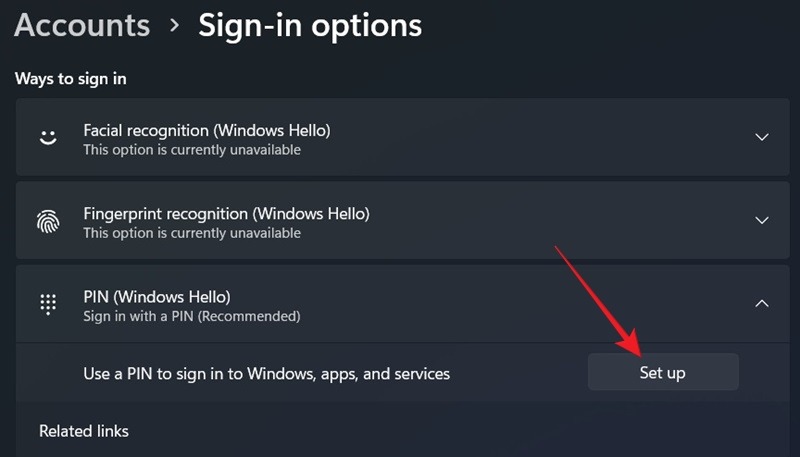
Continue by signing in with your Microsoft account and clicking Next in the Create a PIN screen.
If you want your PIN to be more complex, make sure that you check the Include letters & symbols option. This will allow the PIN to be up to 127 characters long and include both uppercase and lowercase letters, special characters and digits.
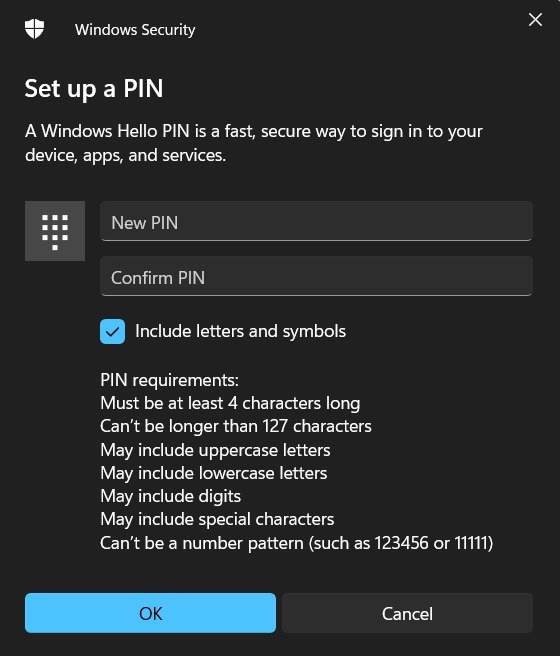
If you’ve previously set up a PIN, you can opt to change it or remove it from.

Note: you won’t be able to remove the PIN if you don’t have an additional authentication method, such as a password, set up. Read on to learn how to protect yourself against password crackers.
When you’re setting a PIN, make sure you enable the For improved security, only allow Windows Hello sign-in for Microsoft account on this device option in the Additional settings section.

Tip: need to quickly enter the login menu on your Windows tablet? Check whether it has a Windows Security button.
6. Use Fingerprint/Facial Recognition
If your device includes a biometric authentication option, switch to it over password authentication. Biometric authentication generally offers a more secure experience. You’ll need to have a PIN set up before enabling any of these options.

Navigate to Settings -> Accounts -> Sign-in options. Depending on your PC model, select either Facial recognition or Fingerprint recognition, followed by clicking the Set up button.
7. Enable SmartScreen
Microsoft’s SmartScreen solution helps you protect your PC from malicious software and potentially harmful websites. It does this by checking the reputation of the apps and files you download or the webpages you visit.
It is enabled by default in Windows Security, but if you need to deactivate it, go to App & browser control -> Reputation-based protection. Click on Reputation-based protection settings to view a list of enabled options.
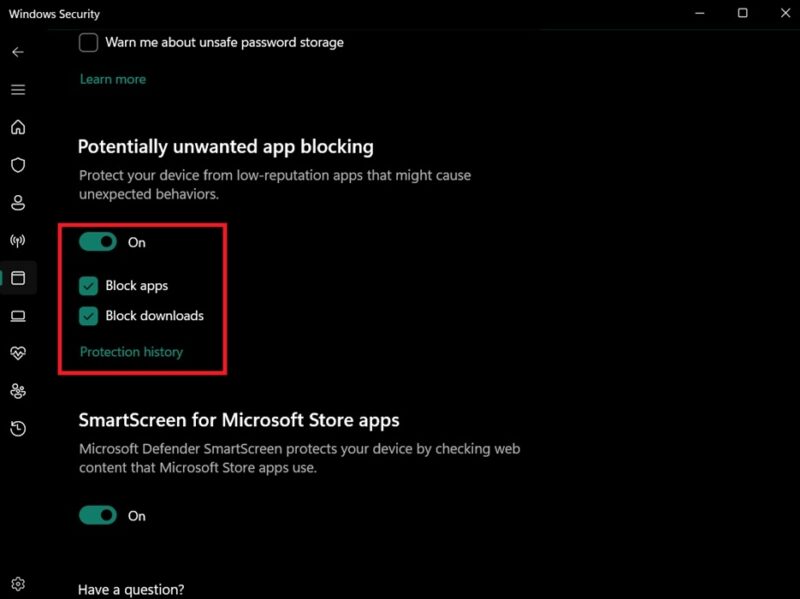
Check them one by one, and disable the one that’s causing interference. For instance, if you’re looking to install an app flagged as having a low reputation, you might want to disable Potentially Unwanted App Blocking.
Tip: you may also want to know how to block certain apps from accessing the Internet.
8. Enable Data Drive Encryption
BitLocker is an option that offers data drive encryption. You may want to activate it to shield your data from prying eyes and potential breaches, as well as safeguard your information from device theft.
This feature is available on Windows 10/11 Pro, Enterprise and Education editions. But some Windows 10/11 Home devices may offer “device encryption” as well (but only if you are using a Microsoft account).
For the purposes of this tutorial, we’re walking you through the steps to enable BitLocker on a Windows 11 Pro device.
Navigate to Windows Security -> Device security, and under the Data encryption section, click on Manage BitLocker drive encryption.
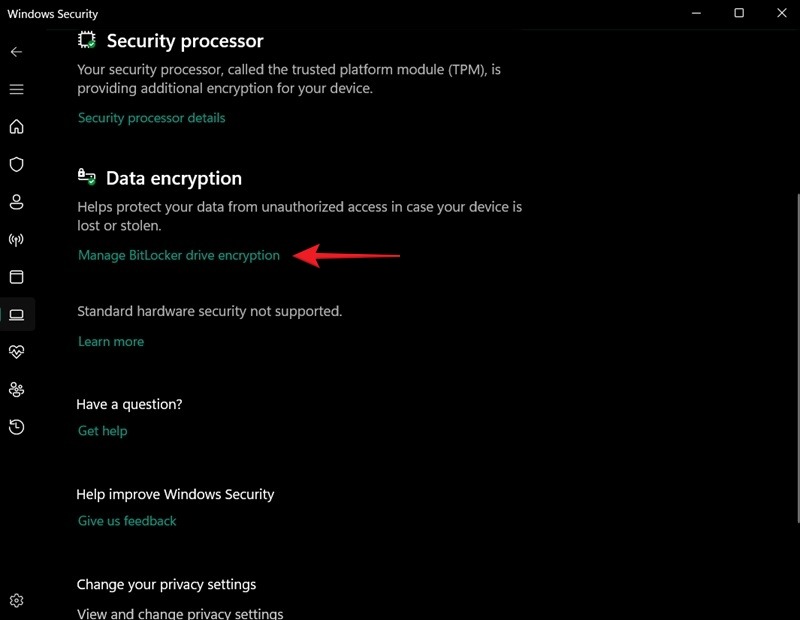
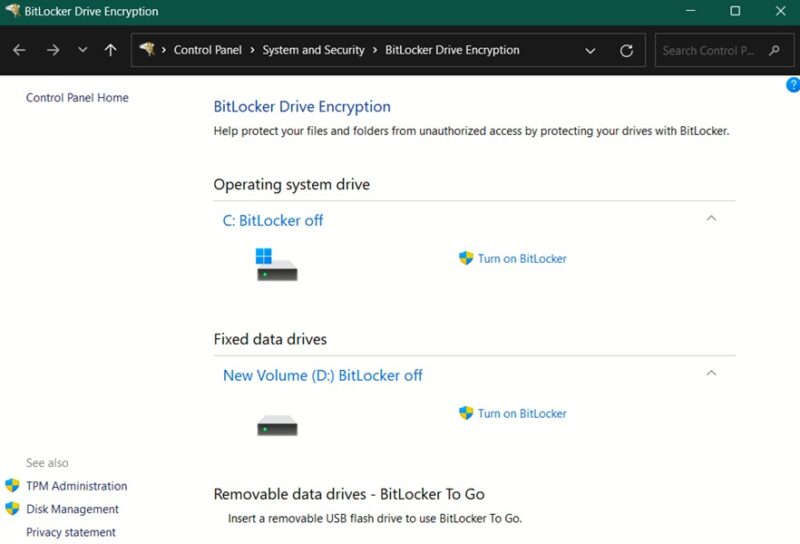
Select the drive you want to encrypt, and press Turn on BitLocker.
Select Use a password to unlock the drive, and input it below.
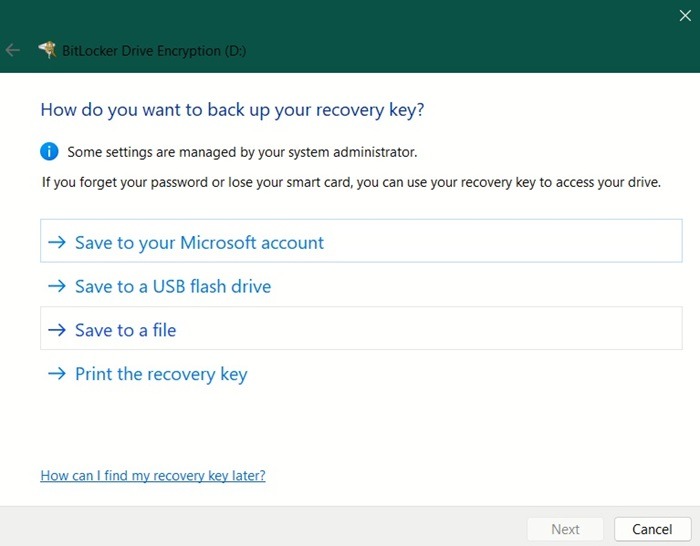
It’s crucial that you back up the recovery key for the drive that’s about to be encrypted. If you need to reinstall Windows or troubleshoot for a certain issue, you will need to input the 48-digit code that is provided in this step. Once you select an option, press Next.
Select whether you want to encrypt the entire drive or just the used space. We recommend the first option, especially if you’re setting BitLocker up on a new drive or PC.
Opt for the new encryption mode.
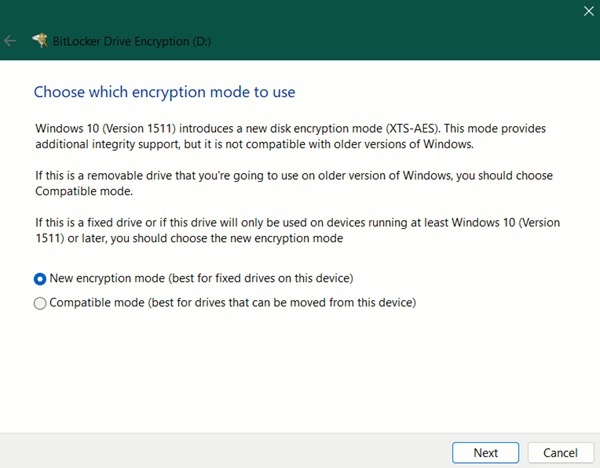
Press the Start encrypting button.
Restart your PC when the encryption is finished. The next time you try accessing your drive, you’ll need to input the password.
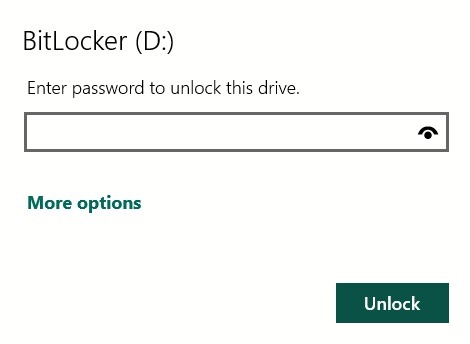
Note: you can also encrypt your USB drives.
Upgrading Your Windows Experience
Remember that following the security tips above should be correlated with always keeping your PC updated to the latest software version available. At the same time, if you’re also craving improved privacy on your Windows PC, you may be looking to reduce the amount of personal data Microsoft collects about you.
Image credit: Freepik. All screenshots by Alexandra Arici.
Our latest tutorials delivered straight to your inbox