It’s a mostly valid assumption that all modern devices support and use Wi-Fi, but the operative word there is “modern.” You only need to look back a few years to find devices that couldn’t connect to the Internet wirelessly. This is where a Raspberry Pi can come in handy: allowing you to create a Wi-Fi bridge capable of connecting these older devices to your wireless network.
- What Is a Wi-Fi Bridge and Why Should I Turn My Raspberry Pi Into It?
- What You’ll Need
- 1. Update the Pi
- 2. Set Up Network Services: dnsmasq
- 3. Configure Ethernet Connection
- 4. Replacing the dnsmasq Configuration File
- 5. Enable IP forwarding
- 6. Forward Traffic from Ethernet to Wi-Fi
- 7. Test the Wi-Fi Bridge
What Is a Wi-Fi Bridge and Why Should I Turn My Raspberry Pi Into It?
A Wi-Fi bridge connects to your network wirelessly and reroutes that signal into a wired connection. When you transform your Raspberry Pi into such a bridge, you enable any Ethernet-only device to access your network via an Ethernet cable connected to the Raspberry Pi. This configuration is particularly useful for devices that lack inherent Wi-Fi capabilities.

Here are several practical uses for this configuration:
- Desktop computers: Many older desktop computers lack built-in Wi-Fi. Use a Raspberry Pi to connect these computers wirelessly to your network and eliminate the need for a direct Ethernet connection between your computer and router.
- Security cameras: For security cameras that only have Ethernet ports, a Raspberry Pi serving as a bridge allows you to position the cameras more flexibly around your home without worrying about wiring constraints.
- Connect legacy printers: Give that old, reliable printer without Wi-Fi a new purpose by connecting it to your network through the Raspberry Pi. Now you can print from any device in your home.
- Smart home integration: Bring non-Wi-Fi smart home devices into your modern setup. Control lights, thermostats, or security cameras that only have Ethernet ports.
- Streaming media to older TVs: Connect older, non-smart TVs to your home network via the Raspberry Pi, enabling them to stream media from services like Netflix or YouTube.
While it’s important to note that a device connected through a Raspberry Pi Wi-Fi bridge may not achieve the same speed and stability as one directly connected to your network, the benefits often outweigh this limitation. In situations where it’s not feasible to physically connect an Ethernet-only device to your router, using a Raspberry Pi you already own as a Wi-Fi bridge is a cost-effective solution to bridge the connectivity gap.
What You’ll Need
To turn your Raspberry Pi into a Wi-Fi bridge, you’ll need:
- Raspberry Pi model with Wi-Fi (built-in, with Raspberry Pi Zero W, Pi3 or Pi4 or a Wi-Fi dongle) running the most recent Raspberry Pi OS
- Power supply for Raspberry Pi
- External keyboard
- HDMI or micro HDMI cable, depending on the model of Raspberry Pi
- External monitor
- Ethernet cable
1. Update the Pi
The first step in any operation like this is to make sure your Pi is up to date. If you haven’t already, attach your external keyboard, monitor, and any other peripherals to your Raspberry Pi, then attach your Pi to a power source.
Open a new Terminal by clicking the “Terminal” icon in Raspbian’s toolbar, then run the following commands:
sudo apt update && sudo apt -y upgrade
2. Set Up Network Services: dnsmasq
Install dnsmasq, which provides Domain Name System (DNS) caching and a Dynamic Host Configuration Protocol (DHCP) server. Use this package to process DNS requests, which will allow your Raspberry Pi to act as a mini-router for an Ethernet-only device.
To install dnsmasq, run the following command:
sudo apt install dnsmasq
3. Configure Ethernet Connection
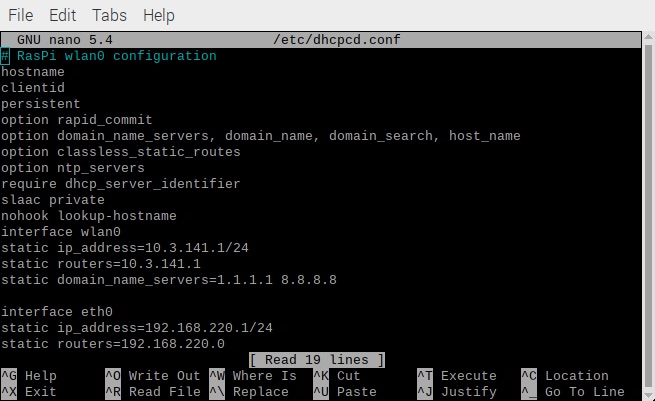
Next, set up the eth0 interface to use a static IP address by modifying the “dhcpcd.conf” file. To open this configuration file, run the following command:
sudo nano /etc/dhcpcd.conf
Add the following to this file:
interface eth0
static ip_address=192.168.220.1/24
static routers=192.168.220.0
Save your changes by pressing Ctrl + O. To close the configuration file, press Ctrl + X.
These changes will go live once you restart the dhcpcd service:
sudo service dhcpcd restart
4. Replacing the dnsmasq Configuration File
The dnsmasq package provides a default configuration file, but you need to replace this with your own custom settings that tell dnsmasq how to handle DHCP and DNS traffic.
Before making any changes, backup the original dnsmasq.conf file. This is good in case you mess it up and have to reset:
sudo nano /etc/dnsmasq.conf /etc/dnsmasq.conf.original
Open the replacement configuration file for editing:
sudo nano /etc/dnsmasq.conf
Add the following to the file:
interface=eth0
listen-address=192.168.220.1
bind-interfaces
server=8.8.8.8
domain-needed
bogus-priv
dhcp-range=192.168.220.50,192.168.220.150,12h
Save your changes, by pressing Ctrl + O. To close the configuration file, press Ctrl + X.
5. Enable IP forwarding
Enable IP forwarding so that your Raspberry Pi can accept network packets from the Ethernet connection and forward them to your router.
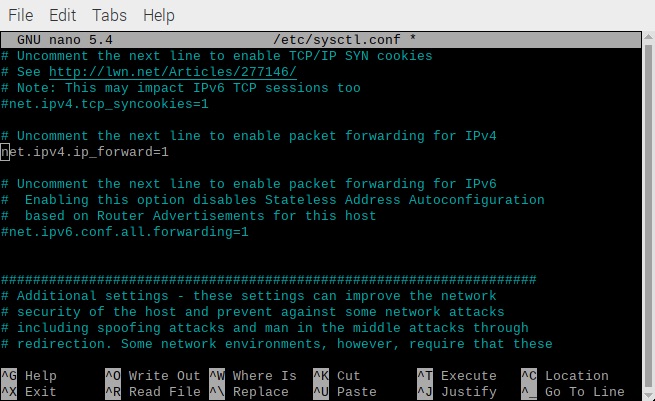
To enable ipv4p IP forwarding, edit the “sysctl.conf” configuration file:
sudo nano /etc/sysctl.conf
The “sysctl.conf” file will now launch in the Nano text editor. Find the following line in this file:
#net.ipv4.ip_forward=1
Remove the # so that this line becomes:
net.ipv4.ip_forward=1
Save your changes by pressing Ctrl + O. To close the configuration file, press Ctrl + X.
Now, bring your new “sysctl.conf” configuration file into effect:
sudo sh -c "echo 1 > /proc/sys/net/ipv4/ip_forward"
6. Forward Traffic from Ethernet to Wi-Fi
Now that you have enabled IP forwarding, you can configure your firewall to forward traffic from the Ethernet interface (eth0) to the Wi-Fi connection. With this forwarding in place, any device that connects to the Raspberry Pi over Ethernet will gain access to the Pi’s Wi-Fi (wlan0) connection.
Add some rules that tell your Raspberry Pi how to forward all the data packets that it receives:
sudo iptables -t nat -A POSTROUTING -o wlan0 -j MASQUERADE
sudo iptables -A FORWARD -i wlan0 -o eth0 -m state --state RELATED,ESTABLISHED -j ACCEPT
sudo iptables -A FORWARD -i eth0 -o wlan0 -j ACCEPT
Save these new rules:
sudo sh -c "iptables-save > /etc/iptables.ipv4.nat"
These rules will get flushed every time your Raspberry Pi reboots, so make sure they’re reloaded at startup.
Define what happens at startup by editing the “rc.local” file:
sudo nano /etc/rc.local
The “rc.local” file will now open in the Nano text editor. Find the following in the editor:
exit 0
Add the following directly above the “exit” line:
iptables-restore < /etc/iptables.ipv4.nat
Save your changes by pressing Ctrl + O. To close the configuration file, press Ctrl + X.ter.”
7. Test the Wi-Fi Bridge
The final step is starting the dnsmasq service:
sudo service dnsmasq startPut your Wi-Fi bridge to the test! Attach any Ethernet-only device to your Raspberry Pi via an Ethernet cable. Your Raspberry Pi will provide an Internet connection to this Ethernet-only device.
With your Raspberry Pi now successfully set up as a Wi-Fi bridge, you’ve unlocked a world of possibilities for your older devices. For those looking to further explore the capabilities of their Raspberry Pi, check out our guide on turning your Raspberry Pi into a wireless access point, offering another exciting project to enhance your home network.
Our latest tutorials delivered straight to your inbox