Have you ever installed a new Linux window manager or desktop environment, only to find that it doesn’t show up on the Sessions list in GDM? Have you ever wanted to remove items from that list? How about create a new list item so that you can boot into a custom desktop environment? It sounds like it should be simple, but many people are surprised by the fact that this small task is actually a bit tricky, and there’s very little documentation to help. We show you how to resolve that with a quick and simple guide to editing your GDM Sessions menu.
Tip: if you are using Gnome, you have to check out these Gnome extensions to improve your desktop experience.
xsessions
The session list is populated by looking at the contents of the “/usr/share/xsessions” directory. In here you’ll find files with the .desktop extension (extension hidden in some file managers). As these files are in a system folder, you will need root privileges to change or delete them.

These .desktop files contain basic information on what this menu item will launch. Removing (or renaming) one of these files will take it off the Sessions list.
Modifying an Item
As noted above, you’ll need root privileges to modify any of the files in “/usr/share/xsessions.” Ubuntu users, for example, can open the terminal and enter the following command:
sudo geditto run the gedit text editor as root.

Open any .desktop file in the “/usr/share/xsessions” directory that you wish to edit.

Tip: you can beautify your Gnome desktop with these good looking themes.
Creating a New Entry
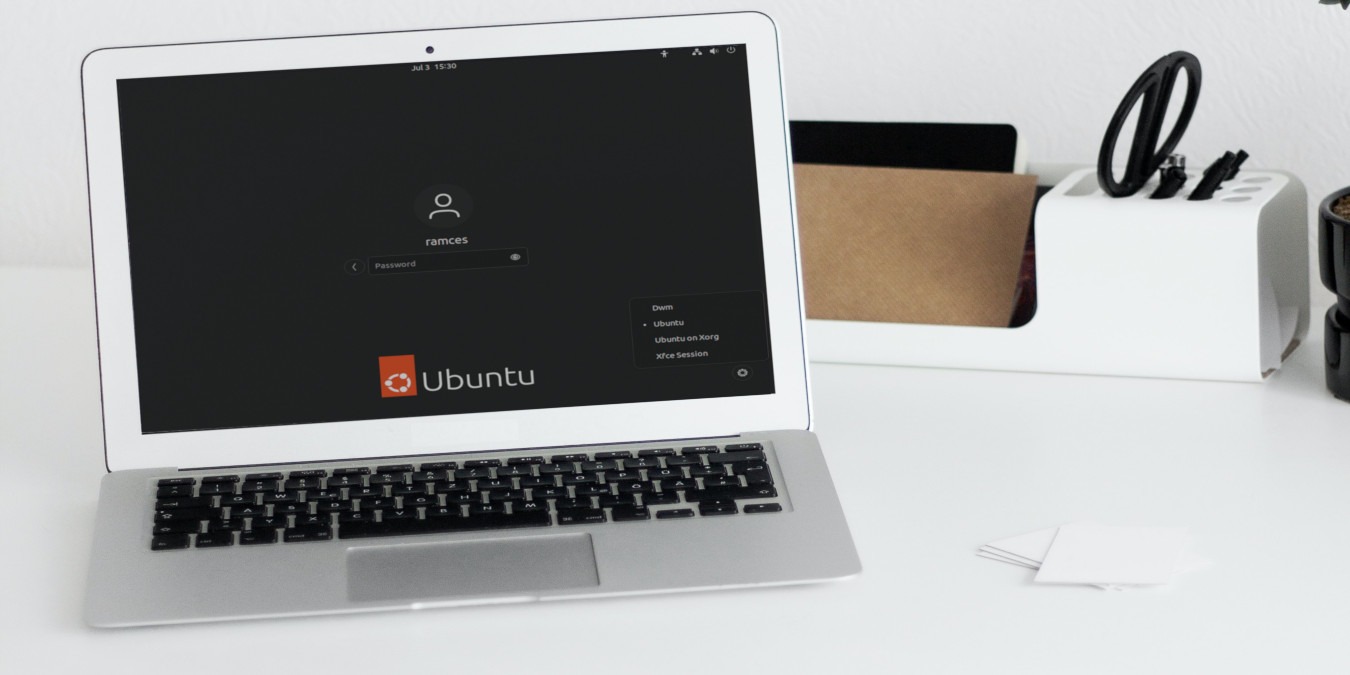
Using the above screenshot as a template, you can design your own entry for the menu.
- The Encoding line is referring to the character encoding used in the file, and can safely be left at UTF-8 for nearly all purposes.
- The Name is what will be displayed on GDM’s Sessions list, followed by a brief description in the Comment line.
- The Exec line is probably the most important in the list. This is the section where you specify the command to run when the menu item is clicked. It will accept command line arguments as well (e.g
gnome-session -f). This line can also be set to a custom script that you have made. - The Icon line, in some circumstances, can be used to specify the icon for an application, but it is not mandatory for the launchers in the session list.
Since .desktop files have uses beyond just GDM, they include a Type field to specify what the file represents. It can be left at “Application” for these purposes.

A complete list of the properties and their meanings can be found here.
Once your file is saved, you’ll now see it listed on the Sessions list when GDM starts up.

Good to know: Learn how to launch any program in the Linux desktop by creating your own .desktop files.
Setting the Default Environment
You also have the option of setting it as the default desktop session. To do this, you need to open your terminal and navigate to the “AccountsService” directory under “/var/lib/.”
cd /var/lib/AccountsService/

Next, switch to the root user account:
sudo -s

Go inside the “users” directory and open your user’s personal session file:
cd ./users
gedit ramces

Once inside, select the “Session=” variable and write the name of the desktop file that you want GDM to load on startup.

After that, add a new line under the “Session=” variable and write “XSession=.” In there, you also need to write the name of the desktop file that you to load. For example, the following snippet of code will change my default desktop from GNOME to XFCE:
[User]
Session=xfce
XSession=xfce
Icon=/home/ramces/.face
SystemAccount=false

[InputSource0]
xkb=us

Lastly, reboot your computer to fully apply your new settings:
reboot

Tip: other than changing desktop environment, you can also switch from Xorg to Wayland in the GDM.
Conclusion
With knowledge of how to control the GDM session options, you’re now in a place where you can create your own custom desktop environment by piecing together the individual components you like.
Image credit: Sarah Dorweiler via Unsplash. All alterations and screenshots by Ramces Red.
Our latest tutorials delivered straight to your inbox