Facebook Messenger may not be everyone’s primary messaging service, but it can still be useful as a second option. Ensure you have access to your contacts on every device by learning how to sync contacts on Facebook Messenger and unsync them if you decide to use something different.
Tip: don’t want people to know that you’ve read their message? Learn how to disable read receipts on Facebook Messenger.
How to Sync and Unsync Your Facebook Messenger Contacts
When you first set up Facebook Messenger on your device, you’re prompted to sync your contacts. If you missed doing it initially, you can still do it in a few simple steps. While this tutorial is written using an Android phone, the steps are the same on iOS.
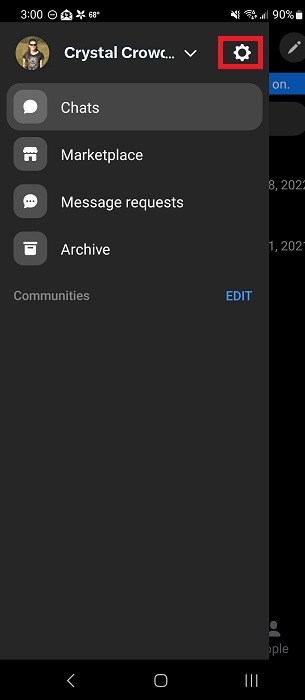
- Open the Messenger app, and tap “Chats.”
- Tap the Settings cog beside your name.
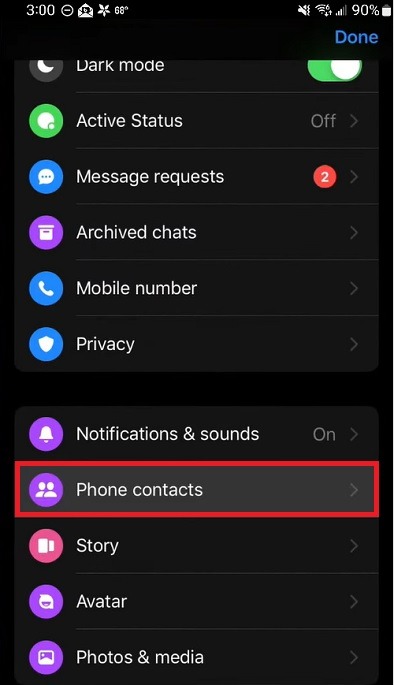
- Tap “Phone contacts” under the “Preferences” section.
- Turn on the sync option beside “Upload contacts.” On Android, your device should automatically start uploading. On iOS, tap the option, then tap “Turn On” on the following screen.
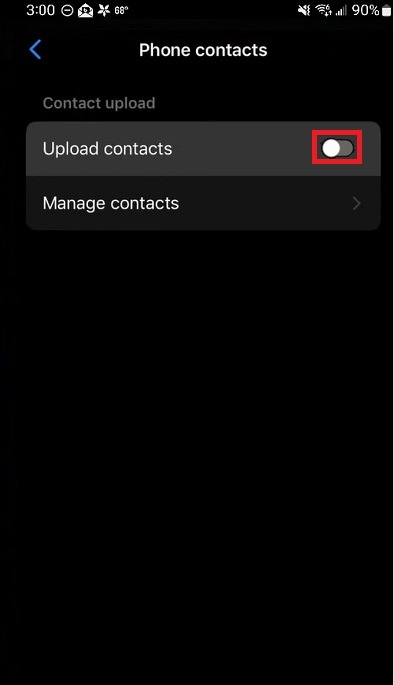
Once turned on, your device will sync contacts daily on Facebook Messenger. This includes names, numbers, and email addresses.
To unsync Facebook Messenger contacts, repeat the same process as above, but this time, turn off the “Upload Contacts” option.
If you notice your contacts are still syncing, you may need to turn off syncing from within your phone’s settings. Follow these steps on Android:
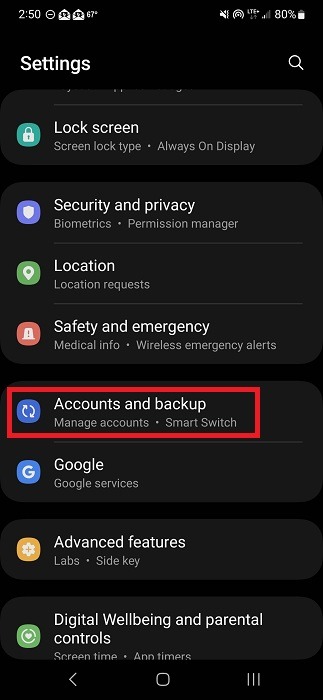
- Go to “Settings,” and tap “Accounts and backup.”
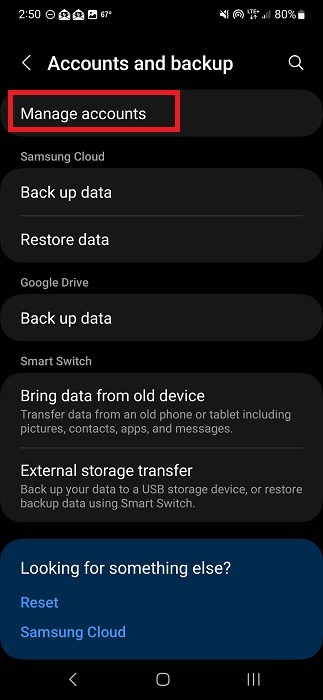
- Tap “Manage accounts.”
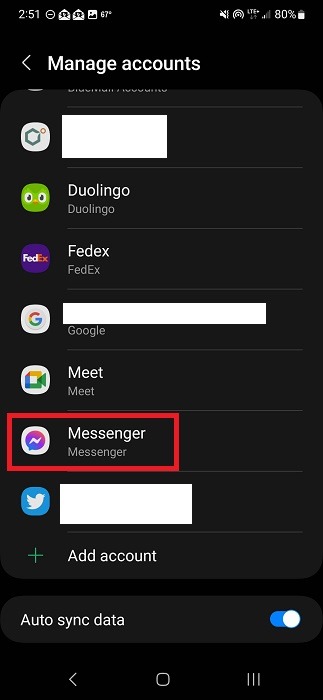
- Tap “Messenger.”
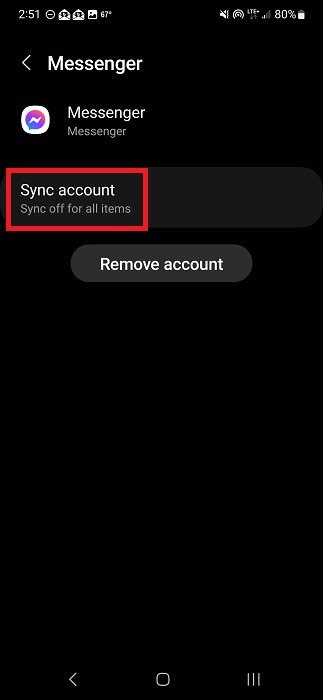
- If “Sync account” is turned on, tap it and turn it off.
Follow these steps on iPhone:
- Open “Settings” and tap “Contacts.”
- Tap “Accounts.”
- Tap “Messenger.”
- If syncing is turned on, turn it off.
Good to know: you can change the default account where contacts are stored by following this guide.
How to Sync and Unsync Your Contacts on Messenger Lite
Since Messenger Lite doesn’t have all the things that the regular app does, you may think that the steps differ with this app, and they do – slightly. Follow these steps if you’re using the light version of Messenger:
- Tap on Settings (cog wheel) at the top right of your display when you first open the app.
- Tap “People.”
- Enable “Sync phone contacts.”
If you want to stop syncing, repeat the process, but turn “Sync phone contacts” to Off.
Good to know: check out these Facebook Messenger features you may not know about.
Delete Your Contacts
If you’re using Messenger Lite, the app is supposed to delete all your contacts once you stop syncing. However, you can tell both apps to delete all your synced contacts. The steps are the same for both Messenger and Messenger Lite. Depending on your version of Messenger Lite, the following options may not exist. If they don’t, you’ll need to download Facebook Messenger and delete your contacts from there.
Make sure you’ve turned off contact syncing before deleting anything. Otherwise, the contacts will just re-sync within 24 hours.
- Tap “Chats” and the Settings icon beside your name.
- Tap “Phone Contacts” in the Preferences section.
- Tap “Manage contacts.”
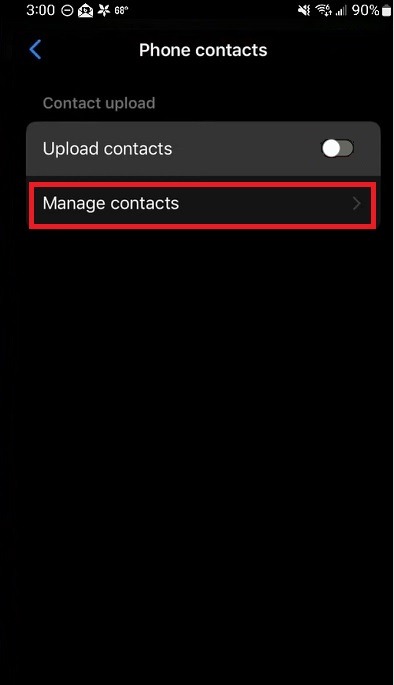
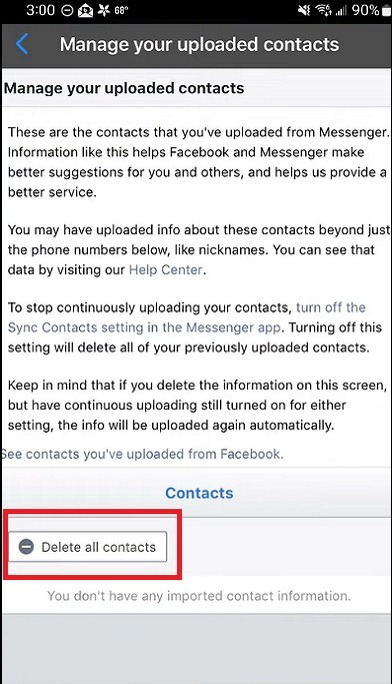
- Read over the details, if you want, and select “Delete all contacts” at the bottom. If you don’t have any contacts currently uploaded, this option is greyed out, and there will be nothing to delete.
If you’ve synced contacts on multiple devices, you’ll need to turn off syncing and delete contacts from each device. Otherwise, your contacts will continue to sync from any other devices you’ve used to log in.
FYI: learn how to delete comments, likes, and reactions on Facebook.
Frequently Asked Questions
How do I remove suggested contacts in Messenger?
Suggested contacts are contacts Messenger thinks you will like based on various interactions and the contacts you’ve uploaded. For instance, if you upload a contact, Messenger may start suggesting all their contacts to you as well.
You can turn off the option to sync contacts on Facebook Messenger and delete all synced contacts to stop those suggestions. Alternatively, hide specific suggestions (“Chats -> Settings -> Privacy and safety -> Hidden contacts”) or block suggested contacts.
You can also clear your search history. When you tap “Search,” you’ll see a list of recent searches. Tap “Edit” and clear all your searches. This still won’t get rid of all suggestions, though.
Essentially, you can’t remove suggestions completely. Every time you have an interaction, Messenger comes up with more people to suggest.
How do I sync my Google contacts with Facebook Messenger?
While it’s most common to sync contacts on Facebook Messenger based on your phone’s contact details, you may keep all your contacts on Google. By default, Google contacts automatically sync with your Android device. If syncing is turned on, your Google contacts will sync with Facebook Messenger as soon as you turn on syncing in the Messenger app.
If Google contact syncing isn’t turned on, open Settings on your Android device, and go to “Google -> Settings for Google Apps -> Google Contacts sync -> Status.” Turn on “Automatically sync.”
To unsync, turn off contact syncing in the Facebook Messenger app. Or, turn off “Automatically sync” in Google settings.
How do I export my contacts from Facebook?
Facebook lets you download all your information, including contacts. On the mobile app, tap the three-bar menu icon, and go to “Settings & Privacy -> Settings -> Profile Settings.” Select “Download your information” under “Your Facebook Information.” Select what you want to download (or download everything), and tap “Create file.” Once you download the file, you’ll find your contacts.
On a computer, click your account at the top right, and go to “Settings & Privacy -> Settings -> Privacy -> Your Facebook Information.” Click “View” beside “Download your information.” Choose what you want to download, create the file, and download it when it’s ready.
What if my phone contacts aren't on Facebook or Messenger?
If your contacts aren’t on Facebook or Messenger, Facebook won’t be able to add them to your list. However, the contact information is stored so that if they ever join, they can be added to your list.
You can manually invite people from the “People” area of the Messenger app.
Also, only contacts that have chosen to share their email addresses and/or phone numbers on Facebook or Messenger can be added by syncing your contacts. If they don’t share this information, Messenger has no way of matching you up.
Image credit: Unsplash. Screencaps by Crystal Crowder.
Our latest tutorials delivered straight to your inbox